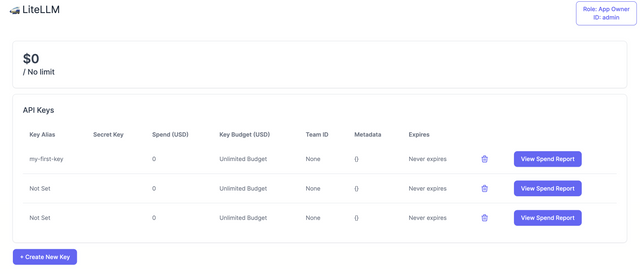
🔑 [BETA] Proxy UI
Create + delete keys through a UI
Let users create their own keys
This is in beta, so things may change. If you have feedback, let us know
Quick Start
- Requires proxy master key to be set
- Requires db connected
Follow setup
1. Start the proxy
litellm --config /path/to/config.yaml

#INFO: Proxy running on http://0.0.0.0:8000
2. Go to UI
http://0.0.0.0:8000/ui # <proxy_base_url>/ui
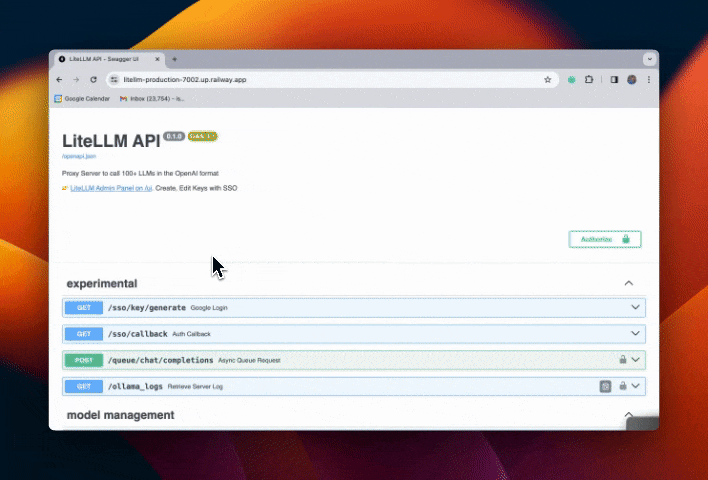
3. Get Admin UI Link on Swagger
Your Proxy Swagger is available on the root of the Proxy: e.g.: http://localhost:4000/

4. Change default username + password
Set the following in your .env on the Proxy
UI_USERNAME=ishaan-litellm
UI_PASSWORD=langchain
On accessing the LiteLLM UI, you will be prompted to enter your username, password
Setup SSO/Auth for UI
Step 1: Set upperbounds for keys
Control the upperbound that users can use for max_budget, budget_duration or any key/generate param per key.
litellm_settings:
  upperbound_key_generate_params:
    max_budget: 100 # upperbound of $100, for all /key/generate requests
    duration: "30d" # upperbound of 30 days for all /key/generate requests
Expected Behavior
- Send a
/key/generaterequest withmax_budget=200 - Key will be created with
max_budget=100since 100 is the upper bound
Step 2: Setup Oauth Client
- Google SSO
- Microsoft SSO
- Generic SSO Provider
- Create a new Oauth 2.0 Client on https://console.cloud.google.com/
Required .env variables on your Proxy
# for Google SSO Login
GOOGLE_CLIENT_ID=
GOOGLE_CLIENT_SECRET=
- Set Redirect URL on your Oauth 2.0 Client on https://console.cloud.google.com/
- Set a redirect url =
<your proxy base url>/sso/callbackhttps://litellm-production-7002.up.railway.app/sso/callback
- Set a redirect url =
- Create a new App Registration on https://portal.azure.com/
- Create a client Secret for your App Registration
Required .env variables on your Proxy
MICROSOFT_CLIENT_ID="84583a4d-"
MICROSOFT_CLIENT_SECRET="nbk8Q~"
MICROSOFT_TENANT="5a39737
- Set Redirect URI on your App Registration on https://portal.azure.com/
- Set a redirect url =
<your proxy base url>/sso/callbackhttp://localhost:4000/sso/callback
- Set a redirect url =
A generic OAuth client that can be used to quickly create support for any OAuth provider with close to no code
Required .env variables on your Proxy
GENERIC_CLIENT_ID = "******"
GENERIC_CLIENT_SECRET = "G*******"
GENERIC_AUTHORIZATION_ENDPOINT = "http://localhost:9090/auth"
GENERIC_TOKEN_ENDPOINT = "http://localhost:9090/token"
GENERIC_USERINFO_ENDPOINT = "http://localhost:9090/me"
Optional .env variables The following can be used to customize attribute names when interacting with the generic OAuth provider. We will read these attributes from the SSO Provider result
GENERIC_USER_ID_ATTRIBUTE = "given_name"
GENERIC_USER_EMAIL_ATTRIBUTE = "family_name"
GENERIC_USER_ROLE_ATTRIBUTE = "given_role"

GENERIC_SCOPE = "openid profile email" # default scope openid is sometimes not enough to retrieve basic user info like first_name and last_name located in profile scope
- Set Redirect URI, if your provider requires it
- Set a redirect url =
<your proxy base url>/sso/callbackhttp://localhost:4000/sso/callback
- Set a redirect url =
Step 3. Test flow
Set Admin view w/ SSO
You just need to set Proxy Admin ID
Step 1: Copy your ID from the UI
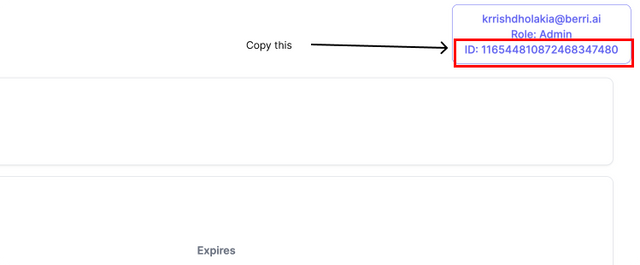
Step 2: Set it in your .env as the PROXY_ADMIN_ID
export PROXY_ADMIN_ID="116544810872468347480"
Step 3: See all proxy keys
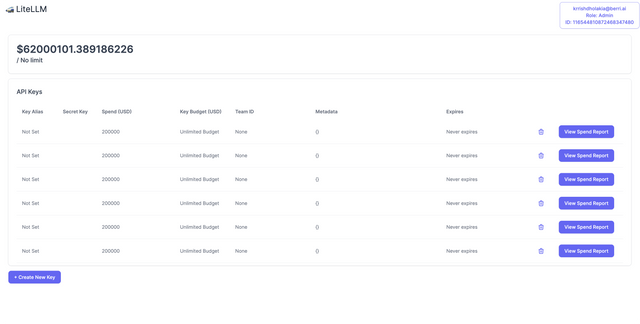
If you don't see all your keys this could be due to a cached token. So just re-login and it should work.